Adobe Illustrator How to: Knitting Illustrations
I've been experimenting recently with Adobe Illustrator. It's an amazing piece of software; there are a few tutorials around on how to make knitting illustrations but I wasn't 100% happy with it as I was sure there was an easier way. I have no experience or training in Illustrator so this is amateur hour. This is what I figured out to produce the illustration below:


I'm assuming you know the basics of illustrator such as how to draw shapes and change the stroke and fill.
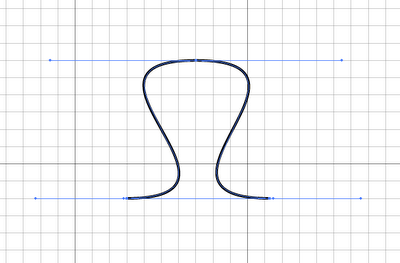
1. First, using the pen tool, draw a knit stitch like the diagram below. There needs to be a stroke colour but make sure there is no fill.

2. Change the stroke weight to about 5pt.

3. Change the stroke to outline stroke by selecting Object --> Path --> Outline Stroke

4. Make sure the stroke stands out so change it to about 1pt and change the colour to black (or any colour you prefer) and change fill to your desired colour; I picked grey. There does need to be a fill colour otherwise the following won't work.
5. Select the knit stitch with the selection tool and copy and paste. Place the copied stitch over the first one (more centered than I did!). As you can see the stitches do not weave together so you need to do a few more steps to achieve this.

6. Highlight the entire shape with the selection tool and find your pathfinder menu; if it's not on the right toolbar then look under the Window tab. Once you've found it click on divide.

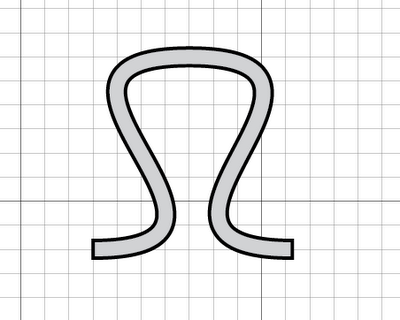
7. It should look like this!

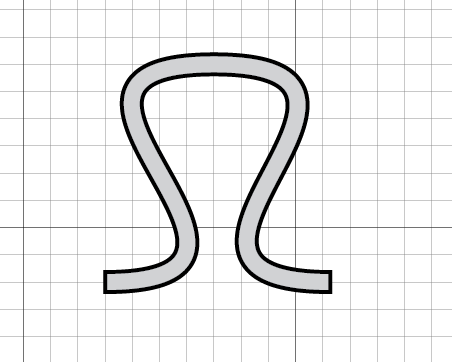
8. Now for the nifty bit. I want it to look like stockinette stitch. I've selected the areas, using the direct section tool and shift +click, below (Click off the shape to make sure you have nothing selected and make sure you click in the centre of the shapes or you may end up selecting adjacent areas). Then select the merge button in shape mode on the pathfinder tab.

9. And voila, those sections appear on the top of the stitch, repeat this for the top stitch. See the selection in the diagram and click merge again.

10. Yay, you've made your first interlocking stitch!

11. To make your knitted section large copy and paste your stitches and line it up next to it. You'll notice that there are black lines at the joins. You'll just need to repeat the process in step 8. Select the areas you want to join and click merge.


12. Continue copy and pasting, then divide and merge until the diagram is at the desired size.

13. To add a knitting needle, it's exactly the same process. Make a needle shape and fill it with a colour (I chose white).

14. Place it in the required position. Notice it'll be on top of your stitches. With the direct selection tool highlight the area covering the needle and the stitches touching it. Use Pathfinder --> Divide and it'll look like this.

15. Using the direct selection tool, select the areas you want to merge, see below for guidance and click Pathfinder --> Shape Mode --> Merge.

16. Nearly there, repeat this for the yarn over the top of the needle. Sometimes I found when you merge, it was the fill colour of the needle that filled the shape (I'm certain there is a way around this). Just change the fill back to the correct colour.

17. Finished!

Don't know if this is the easiest way of doing it but seemed right to me and kept the shapes simple without having lots of layers.
Great instructions Jo & generous skill sharing.
ReplyDeleteThanks Loraine. I remember the frustration when I was trying to do this myself and thought I'd share what I'd discovered.
DeleteThank you for these excellent directions. You're so generous to share them. I can't believe I only just found this now! I'm posting it on the Vancouver Yarn twitter for others to use. Thanks again!
ReplyDeleteJanna